Auto Scaling Web App In AWS Using Terraform

Deploying Auto Scaling Group for your application in AWS using Browser is easy but with Terrafrom you have important decisions to take, let’s do it together.
Project Overview
This project is about deploying a web app in AWS EC2 instances managed by Auto Scaling and load balanced by Application Load Balancer (ALB). AWS has documented the setup and manual UI approach of implementing this project. This is that specific setup I am going to follow but using Terraform:

Following is the brief overview of this setup:
- Actually Servers sits in private subnet behind NAT Gateway -> Not accessibe from the outsite world but still able to download updates or packages required for the web app
- NAT Gateway belongs to public subnet -> Even though NAT Gateway is for private subnet to make internet connection possible (outbound), NAT Gateway itself sits on public subnet (because it requires public IP, this is like home router)
- Load Balancers are in public subnet -> Application is exposed by ALB public DNS Name which has to reachable publicly from outside the world
- VPC Wide Internet Gateway -> Every public network is connected to Internet Gateway and unlike NAT Gateway it allows both inbound and outbound traffic inside VPC resources which is what makes ALB accessible from the internet
About Security Groups: It is ideal to have two security groups:
- Security Group for Load Balancers -> Allow inbound traffic to ALB listening port from the world
- Security Group for Application Servers -> Allow inbould traffic to application port from Load Balancer only
What changes in this project?
This is no architectual decision but decision driven for simplicity.
- Since the Application (you will see code in a while) is not designed to access S3 Bucket, S3 Gateway is excluded
- Since this is just a practical only one security group is created with following rules:
- Allow inbound traffic on port
80(Both Application and ALB are listening here) applied to both Servers and ALB from outside the world (IPV40.0.0.0/0) - Allow inbound traffic on port
22from outside the world for the sake of spinning up basiton host in case of any issue for debugging purposes
- Allow inbound traffic on port
Warning
I have already mentioned this is the bad security mechanism to expose SSH port and even port 80 of Servers accessible from the world (even though they are behind NAT, why do something not needed?). This is choosed for the sake of simpicity only and not intended for production usage.
Tip
If you require source code, see the final take. Good luck, it’s going to be quite long but hopefully interesting!
What Application Looks Like
Since the project includes ALB, instead of writing complex logic to show ALB working directly from the browser, I opt to show Hostname and Private IP address of EC2 instances so that when ALB does load balancing I can see where the traffic is going to directly from the browser without any complex logic and manual metrics lookup:
<!DOCTYPE html>
<html>
<head>
    <title>ALB Demo</title>
</head>
<body>
    <h1>Hello from EC2</h1>

    <p><strong>Hostname:</strong> $HOSTNAME</p>
    <p><strong>Private IP:</strong> $PRIVATE_IP</p>
</body>
</html>
Actually this application is setup using EC2 User Data feature which does everything from installing nginx to writing index.html and enableing the server:
#!/bin/bash

# Wait for apt/dpkg locks to clear
while fuser /var/lib/dpkg/lock-frontend >/dev/null 2>&1; do
    sleep 2
done

# Update package lists and install Nginx
apt-get update
apt-get install -y nginx

# Get IMDSv2 token
TOKEN=$(curl -sS --max-time 5 \
    -X PUT \
    "http://169.254.169.254/latest/api/token" \
    -H "X-aws-ec2-metadata-token-ttl-seconds: 21600")

HOSTNAME=$(hostname)

# Get private IP from EC2 metadata
PRIVATE_IP=$(curl -sS --max-time 5 \
    -H "X-aws-ec2-metadata-token: $TOKEN" \
    "http://169.254.169.254/latest/meta-data/local-ipv4")

# Fallback if metadata is unavailable
if [ -z "$PRIVATE_IP" ]; then
    PRIVATE_IP=$(hostname -I | awk '{print $1}')
fi

# Write HTML
cat > /var/www/html/index.html <<EOF
<!DOCTYPE html>
<html>
<head>
    <title>ALB Demo</title>
</head>
<body>
    <h1>Hello from EC2</h1>

    <p><strong>Hostname:</strong> $HOSTNAME</p>
    <p><strong>Private IP:</strong> $PRIVATE_IP</p>
</body>
</html>
EOF

# Enable and start Nginx
systemctl enable nginx
systemctl start nginx
An Unavoidable Fact
The following part of the script is written using generative AI (unavoidable these days):
# Wait for apt/dpkg locks to clear
while fuser /var/lib/dpkg/lock-frontend >/dev/null 2>&1; do
    sleep 2
done
This is because I could not figure out why my user script was breaking mid installation of nginx and as suggested by AI, it turns out the reason I was unfamiliar till date:
On Debian/Ubuntu, package managers such as apt, apt-get, and dpkg use lock files to prevent two package-management operations from running at the same time.
Maybe some other processes were using apt-get or dpkg (don’t know why because if they were using why script fails halfway) and that’s okay because problem was solved after that.
One more thing to note is that I use metadata server http://169.254.169.254/latest/meta-data/ to query HOSTNAME and PRIVATE_IP instead of hostname -I in the first place because metadata server is the first real source of truth.
hostname -I is Linux thing and may fail (flagged by AI too but I don’t think so as I am in default namespace where networking should be available and not in different namespace where networking is disabled or not available).
Important
As seen above, User Data is prone to failure (also saw some Stackoverflow’s post), I believe the best way to initialize your application is making use of EBS volume and custom AMI where everything is pre-installed because the real application logic is far more complex and different than what is shown here.
Terraform Begins Here
While using modules is the easiest and arguably the best approach, but I opt using aws resources just to go bit by bit because abstraction done by modules hides implementation which is not what I want want when learning.
Important
Because I am doing practical, I tried but could not follow naming convention as I forget to change resources’ addresses after copy pasting from the Terraform registry. I should have been more careful but no shame on that.
Prerequisites
AWS Authentication & Authorization: It is already setup outside Terraform. There is no way I am pinning AWS Secrets on .tf files. See AWS docs to set up AWS credentials in the best way possible. It is also required to set permissions for the User or Role to complete the whole project. It is always nice to have exact granular permission set just enough to complete what’s necessary but it requires manual hardwork or cloudtrail setup which is overkill for simple personal projects.
So despite not being security best practice, I choose AmazonEC2FullAccess and AmazonVPCFullAccess (I really don’t want to stress over granular permission just unless money is involved) – secrets already deleted moment after project completion.
While the project can be completed with one Terraform apply, it may not be always done the same way. I have tested few times to make sure I can get infra with one apply and delete infra with one destory – I will explain some problems I got later I faced before reaching the setup.
Note
One thing to note is that the decision I take may not be the perfect solution and bettering code is part of the process. So I am not ashamed of any pitfalls I may have left behind. Everybody is welcomed for discussion.
0: Provider Setup (Start Here)
It is a straightforward copy and paste from the official docs:
Terraform {
  required_providers {
    aws = {
      source  = "hashicorp/aws"
      version = "~> 6.0"
    }
  }
}
AWS credentials and region is configured outside the Terraform so I choose not to write provider aws {} block.
1. VPC Setup
resource "aws_vpc" "auto_scaling" {
  cidr_block       = var.cidr
  instance_tenancy = "default"

  tags = {
    Name      = var.vpc_name
    Terraform = true
  }
}

# add internet gateway to vpc
resource "aws_internet_gateway" "igw" {
  vpc_id = aws_vpc.auto_scaling.id

  tags = {
    Name      = "${var.vpc_name}-igw"
    Terraform = true
  }
}

resource "aws_vpc_security_group_vpc_association" "ssh_http_allow" {
  security_group_id = var.security_group_id
  vpc_id            = aws_vpc.auto_scaling.id
}
I think
aws_vpcandaws_internet_gatewayare obvious to understand but what about the next resourceaws_vpc_security_group_vpc_association?
Actually, I should have create Security Group directly using Terraform but before writing a single line in Terraform I have done this demo using UI and have left that Security Group undeleted. Therefore explicit VPC association is required for the Security Group else creating ALB and Auto Scaling Group fails using that Security Group which is not associated with the VPC created here.
The truth is I had not knew about this before this exercise. Initially, I have hard coded Security Group ID when creating ALB and terraform plan complains and hence solved by associating. The variables used in this step:
variable "vpc_name" {
  type    = string
  default = "auto-scaling"
}

variable "cidr" {
  type    = string
  default = "10.0.0.0/24"
}


variable "security_group_id" {
  type = string
  default = "sg-0f67f474be904cb21"
}
Note
If you have noticed tags, I tried to start declaring names in a certain way ( Name = "${var.vpc_name}-igw") in order to follow similar naming on later steps but I failed since it was not fully planned on paper and missed halfway.
2. Private And Public Subnets
Private Subnet for Applications (EC2 instances) and Public Subnets for ALB looks like:
# private and public subnets in ap-south-1a
resource "aws_subnet" "subnets_az_1a" {
  vpc_id = aws_vpc.auto_scaling.id

  for_each = var.subnets_az_1a

  availability_zone       = var.availability_zones["az_1a"] # ap-south-1a
  map_public_ip_on_launch = startswith(each.key, "public-") # true if subnet is public

  cidr_block = each.value

  tags = {
    Name      = each.key
    Terraform = true
  }
}

# private and public subnets in ap-south-1a
resource "aws_subnet" "subnets_az_1b" {
  vpc_id = aws_vpc.auto_scaling.id

  for_each = var.subnets_az_1b

  availability_zone       = var.availability_zones["az_1b"] # ap-south-1b
  map_public_ip_on_launch = startswith(each.key, "public-") # true if subnet is public

  cidr_block = each.value

  tags = {
    Name      = each.key
    Terraform = true
  }
}
One thing to talk is this line:
map_public_ip_on_launch = startswith(each.key, "public-")I have named subnets (var.subnets_az_1b) in such a way that they prefix public- for public subnets and private- for private ones. Since public ip address is required only for resources inside public subnet map_public_ip_on_launch is true only for public subnets. I believe this is where naming becomes important in Terraform.
I have already mentioned, I have spent very less time on planning names or varibles on paper so the design may not be perfect but it works:
variable "availability_zones" {
  type = map(string)
  default = {
    "az_1a" = "ap-south-1a",
    "az_1b" = "ap-south-1b"
  }
}

variable "subnets_az_1a" {
  description = "subnets in ap-south-1a"
  type        = map(string)
  default = {
    "private-subnet-1a" = "10.0.0.0/26"
    "public-subnet-1a"  = "10.0.0.64/26"
  }
}

variable "subnets_az_1b" {
  description = "subnets in ap-south-1b"
  type        = map(string)
  default = {
    "private-subnet-1b" = "10.0.0.128/26"
    "public-subnet-1b"  = "10.0.0.192/26"
  }
}
As per the setup described in the project overview, this step completes one public and one private subnets on each subnet. But actually none of the subnets defined here are private or public yet because this is the thing to be characterized by routes tables and not the naming i.e. Naming subnet public- or private- does not make the subnet public or private – route tables make the whole difference but even before that NAT Gateways are required for private subnet routes to be associated as default route destination.
3. NAT Gateways
# allocate eip
resource "aws_eip" "ngw" {
  for_each = local.public_subnets

  domain = "vpc"

  tags = {
    Name      = "ngw-${each.key}"
    Terraform = true
  }
}

# ngws for private subnets (ngw itself be on public subnets)
resource "aws_nat_gateway" "ngw" {
  for_each = local.public_subnets

  allocation_id = aws_eip.ngw[each.key].id
  subnet_id     = each.value

  tags = {
    Name      = "ngw-${each.key}"
    Terraform = true
  }

  depends_on = [aws_internet_gateway.igw]
}
First Elastic IP needs to be allocated for NAT Gateway and then NAT Gateway resource uses that EIP. This sounds simple but and it is simple too seeing now.
But what was actually difficult for me is designing key for these resources because I require two EIP to be allocated for NAT Gateway. The NAT Gateway requires allocation_id of EIP and subnet_id too. This was okay and I thought I will create a map of allocation_id => subnet_id or the reverse, that should work and I tried too but Terraform complains:
for_eachdepends on resource attributes that cannot be determined until apply
I didn’t understand and saw the Terraform documentation for for_each meta argument and it says:
The keys of the map or all values in a set of strings must be known values. Otherwise, Terraform returns an error message that for_each has dependencies that cannot be determined before apply and that a -target may be needed.
Exactly the error I got. It is saying that key must be known before apply. This means you can’t have key which value is known only after terraform apply. So, when designing key what needed to be clear is that for anything Terraform says as Known After Apply can’t be the part of key. Enough talking, let’s see the exact line:
for_each before (conceptually):
resource "aws_eip" "ngw" {
  for_each = toset(local.public_subnet_ids)
  ...
}

resource "aws_nat_gateway" "ngw" {
  for_each = local.subnet_id_to_allocation_id

  allocation_id = each.key
  subnet_id     = each.value
  ...
}
locals {
allocation_ids = [for alloc_id in aws_eip.ngw : alloc_id.id]
public_subnet_ids = [
for subnet in merge(aws_subnet.subnets_az_1a, aws_subnet.subnets_az_1b) :
subnet.id if startswith(subnet.tags["Name"], "public-")
]
subnet_id_to_allocation_id = zipmap(local.allocation_ids, local.public_subnet_ids)
}The problem was the same described above i.e. allocation_ids are known only after apply which can’t be used as keys.
for_each after:
resource "aws_eip" "ngw" {
  for_each = local.public_subnets
  ...
}

resource "aws_nat_gateway" "ngw" {
  for_each = local.public_subnets

  allocation_id = aws_eip.ngw[each.key].id
  subnet_id     = each.value
  ...
}
locals {
public_subnets = {
for subnet_name, subnet in merge(
aws_subnet.subnets_az_1a,
aws_subnet.subnets_az_1b
) :
subnet_name => subnet.id
if startswith(subnet.tags["Name"], "public-")
}
}Notice the allocation_id line above:
allocation_id = aws_eip.ngw[each.key].idBecause the key is actually something starting with public- for aws_eip.ngw resource, allocation_id is extracted using:
aws_eip.ngw[each.key].idWhich becomes:
aws_eip.ngw["public-something"].idThis satisfies the key because it is known at terrafrom plan time.
4. Route Tables
As talked earlier, even though NAT Gateways are associated with (private) subnets, subnets only become private or public by the design of route table. The idea is simple:
- Private Subnet -> default route
0.0.0.0/0goes through Internet Gatewayigw-xxxxxxxxxx - Public Subnet -> default route
0.0.0.0/0goes through NAT Gatewayngw-xxxxxxxxxx
Because this is long code, I am breaking down in three pieces to explain better. First the route table. The route table is actually just an empty table with no routes added yet because AWS provides aws_route_table and aws_route as a separate resource to manage:
# define route tables
resource "aws_route_table" "all" {
vpc_id = aws_vpc.auto_scaling.id
for_each = toset(local.route_table_names)
tags = {
Name = each.key
Terraform = true
}
}local.route_table_names are actually almost the same names as subnet names – prefixed by rt- for clarity so that a subnet like public-something becomes rt-public-something and nothing more:
locals {
subnet_names = concat(
keys(var.subnets_az_1a),
keys(var.subnets_az_1b)
)
route_table_names = [
for subnet_name in local.subnet_names : "rt-${subnet_name}"
]
}Route tables needs routes and those routes have to be associated to subnets. Public first becaue it’s easy as only one destination hop is involved i.e. Interet Gateway as aws_internet_gateway.igw.id.
# add routes to above route tables (only for public route tables)
resource "aws_route" "public_routes" {
for_each = {
for key, route_table in aws_route_table.all :
key => route_table
if startswith(key, "rt-public-")
}
route_table_id = each.value.id
destination_cidr_block = "0.0.0.0/0"
gateway_id = aws_internet_gateway.igw.id
}
# associate above route tables to (public only)
resource "aws_route_table_association" "public" {
for_each = local.public_subnets_route_tables
subnet_id = merge(
aws_subnet.subnets_az_1a,
aws_subnet.subnets_az_1b
)[each.key].id
route_table_id = each.value
}Since local.public_subnets_route_tables has already filtered out public subnets, subnet_id = merge(...)[each.key].id only provides subnet id for public subnets:
locals {
public_subnets_route_tables = {
for subnet_name, subnet in merge(
aws_subnet.subnets_az_1a,
aws_subnet.subnets_az_1b
) :
subnet_name => aws_route_table.all["rt-${subnet_name}"].id
if startswith(subnet_name, "public-")
}
}Adding NAT Gateway to private routes were a bit complicated because unlike public routes here two NAT Gateways are involved and key doesn’t exactly match to the one generated by for_each. This is because route_table_id is required only for private routes where key startswith rt-private- but the keys for aws_nat_gateway.ngw resources actually starts with public.
Because everything after rt-private- and public- is exactly the same for both route tables and NAT Gateway replace() function is used to calculate nat_gateway_id (if you are confused read again):
# add routes to above route tables (only for private route tables)
resource "aws_route" "private_routes" {
for_each = {
for key, rtb in aws_route_table.all :
key => rtb
if startswith(key, "rt-private-")
}
route_table_id = each.value.id
destination_cidr_block = "0.0.0.0/0"
nat_gateway_id = aws_nat_gateway.ngw[
replace(each.key, "rt-private-", "public-")
].id
}
# associate above route tables to (private only)
resource "aws_route_table_association" "private" {
for_each = local.private_subnets_route_tables
subnet_id = merge(
aws_subnet.subnets_az_1a,
aws_subnet.subnets_az_1b
)[each.key].id
route_table_id = each.value
}Similar to public subnets, local.private_subnets_route_tables has already filtered out private subnets, therefore subnet_id = merge(...)[each.key].id only provides subnet id for private subnets:
locals {
private_subnets_route_tables = {
for subnet_name, subnet in merge(
aws_subnet.subnets_az_1a,
aws_subnet.subnets_az_1b
) :
subnet_name => aws_route_table.all["rt-${subnet_name}"].id
if startswith(subnet_name, "private-")
}
}5. Launch Template
Auto Scaling Group requires Launch Template from which it can actually launch EC2 instances using the exact specification defined on Launch Template. I try to keep it minimal:
resource "aws_launch_template" "example" {
name = var.launch_template_name
# ami
image_id = "ami-01a00762f46d584a1" # ubuntu AMI copied after searching (not from data block)
# instance settings (could have defined cpu settings but it's enough)
instance_type = "t3.nano"
# ssh key
key_name = "ec2-key" # managed outside Terraform (already created)
# networking details
vpc_security_group_ids = [aws_vpc_security_group_vpc_association.ssh_http_allow.security_group_id] # managed outside Terraform
# storage
block_device_mappings {
device_name = "/dev/sda1"
ebs {
volume_size = 8
volume_type = "gp3"
delete_on_termination = true
encrypted = true
}
}
# tags
tag_specifications {
resource_type = "instance"
tags = {
Name = var.launch_template_name
Terraform = true
}
}
# advanced settings (only user_data)
user_data = filebase64("${path.module}/user_data.sh")
}variable "launch_template_name" {
type = string
default = "lt-auto-scaling"
}image_id is hardcoded because it won’t break (could have used data block however). As talked earlier, vpc_security_group_ids is for EC2 instances and taken from VPC association of SG managed outside Terraform:
vpc_security_group_ids = [aws_vpc_security_group_vpc_association.ssh_http_allow.security_group_id]Also user_data is set for this Launch Template so that when Auto Scaling Group launches EC2 instances, they should be pre-baked with our application:
user_data = filebase64("${path.module}/user_data.sh")6. Load Balancer Target Group
Auto Scaling Group also requires Target Group which defines the target_type is EC2 instances. Actually, Auto Scaling Group manages launched instances via this Target Group which also checks health status of those instances. Also, this is the same Target Group where ALB will forward the traffic to in specified port 80 where our app is listening for web traffic:
resource "aws_lb_target_group" "test" {
# immutable settings
name = "tg-${var.vpc_name}"
target_type = "instance" # default
vpc_id = aws_vpc.auto_scaling.id
port = 80
protocol = "HTTP"
# default health check yet defined to be specific
health_check {
enabled = true
path = "/"
}
# mutable settings
tags = {
Name = "tg-${var.vpc_name}"
Terraform = true
}
}7. Load Balancer
It is obvious Target Group requires Load Balancer because ALB will ultimately forward traffic to that Target Group – that’s the default_action for aws_lb_listener resources below.
This ALB is listening for HTTP traffic on port 80. For real infra, it should actually be listening for HTTPS traffic on port 443 which requires certificates and I thought it might be overkill for this simple demo. So, stayed with default 80.
subnets is actually public subnet determined by values(local.public_subnets) which is obvious and already discussed that ALB sits on public subnets on each Availability Zone. security_groups is same as EC2 instances for simplicity discussed at the very beginning of this post.
The actual association of Load Balancer (ALB) with Target Group is done by exact this line defined at default_action block of aws_lb_listener.front_end resource:
target_group_arn = aws_lb_target_group.test.arn# define alb
resource "aws_lb" "auto_scaling" {
name = "alb-${var.vpc_name}"
load_balancer_type = "application"
internal = false
security_groups = [aws_vpc_security_group_vpc_association.ssh_http_allow.security_group_id] # managed outside Terraform
subnets = values(local.public_subnets)
ip_address_type = "ipv4"
tags = {
Name = "alb-${var.vpc_name}"
Terraform = true
}
}
# define listener
resource "aws_lb_listener" "front_end" {
load_balancer_arn = aws_lb.auto_scaling.arn
port = "80"
protocol = "HTTP"
default_action {
type = "forward"
target_group_arn = aws_lb_target_group.test.arn
}
}For aws_lb resource subnets, values() function extracts ony the values (not key) of local.public_subnets which is already shown before when descibing for_each meta argument but yet here it is:
locals {
  public_subnets = {
    for subnet_name, subnet in merge(
      aws_subnet.subnets_az_1a,
      aws_subnet.subnets_az_1b
    ) :
    subnet_name => subnet.id
    if startswith(subnet.tags["Name"], "public-")
  }
}8. Auto Scaling Group (Finally)
As talked earlier, Auto Scaling Group requires:
- Launch Template -> Already defined here -> accessed here at
launch_templateblock usingid - Target Group -> Already defined here (the same as ALB Target Group) -> accesed here using
target_group_arns
I actually find argument for aws_autoscaling_group resource i.e. vpc_zone_identifier quite strange – it takes subnets on which Auto Scaling Group launches EC2 instances that will be managed by Target Group eventually.
But vpc_zone_identifier talking list of subnets as value? Quite poor naming from AWS Terraform team, anyway here it is:
vpc_zone_identifier = values(local.private_subnets)Yes, EC2 instances will be launched on private subnets as designed that way, hence local.private_subnets is used:
resource "aws_autoscaling_group" "front_end" {
  name                = "asg-web-app"
  vpc_zone_identifier = values(local.private_subnets)
  desired_capacity    = 2
  max_size            = 2
  min_size            = 2
  target_group_arns   = [aws_lb_target_group.test.arn]

  launch_template {
    id      = aws_launch_template.example.id
    version = "$Latest"
  }

  tag {
    key                 = "Name"
    value               = "asg-web-app"
    propagate_at_launch = true
  }

  tag {
    key                 = "Terraform"
    value               = true
    propagate_at_launch = true
  }
}
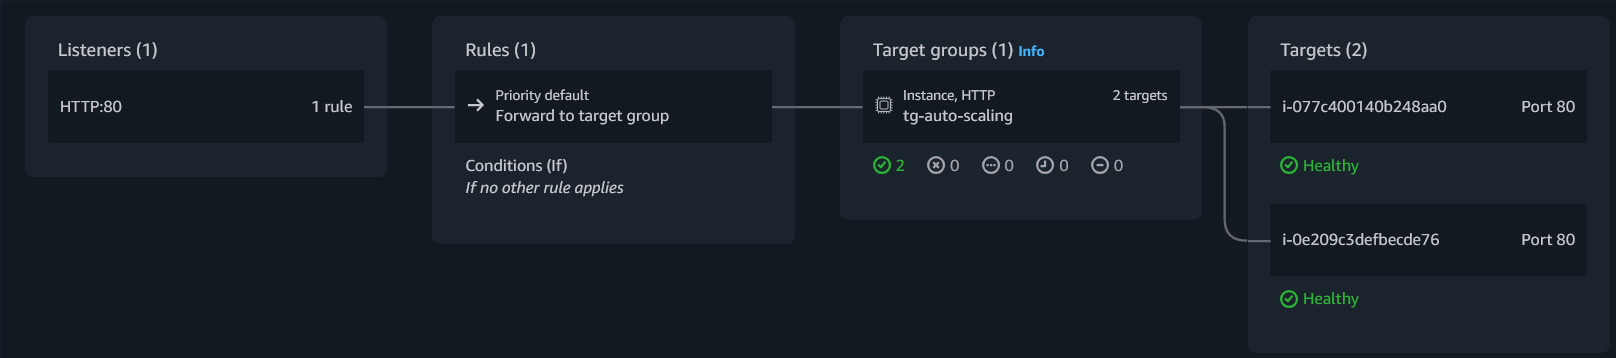
The relationship defined by Auto Scaling Group is:
ALB listens on port
80-> Forwards to Target Group -> Forwards to EC2 where app is listening on port80
Outputs
The application was designed to show that Load Balancer is working directly into the browser. Upon refresh, you will see Hostname and Private IP changes – ALB is forwarding traffic to different application instances:
For the whole project, I believe load_balancer_address should have been enough as outputs but yet I exposed these many:
output "vpc_details" {
  value = {
    name = aws_vpc.auto_scaling.tags["Name"]
    cidr = aws_vpc.auto_scaling.cidr_block
    id   = aws_vpc.auto_scaling.id
    igw  = aws_internet_gateway.igw.id != "" ? aws_internet_gateway.igw.id : "not associated"
  }
}

output "subnets" {
  description = "Map of subnet names to their AWS Subnet IDs in both AZs"

  value = merge(
    {
      for key, subnet in aws_subnet.subnets_az_1a : key => subnet.cidr_block
    },
    {
      for key, subnet in aws_subnet.subnets_az_1b : key => subnet.cidr_block
    }
  )
}

output "route_tables" {
  value = { for key, route_table_details in aws_route_table.all : key => route_table_details.id }
}

output "load_balancer_address" {
  value = aws_lb.auto_scaling.dns_name
}
The Final Take
- It costs aroung
$2to complete the project -> some tweaking, mistakes, typo, etc. costs more time, hence more money - Designing
keyforfor_eachis crucial -> requires naming convention planning and variable, data types planning - It is hard to describe code than writing it and that too step by step -> took good enough time to complete this blog post
As promised earlier, source code is available at Github repository – not prefect at all and no plan to maintain too (money is not involved and no real reason to maintain dummy practical). Good bye till next time!